To answer some of your questions on how I added some of the things I added to somewhat protect my pics:
Lisa was the one I got most of my info. for so check out her post as well!
- The thing that I did to enable left click was just to simply move my pictures around in my post after uploading- I rarely upload them into the correct order so I'm always moving them up or down. If you don't move them though, you can left click on them. I do this now because I just don't want to have to add the code that Lisa talks about in her post, for each of my pics. I figure if this works, I'm sticking with it.
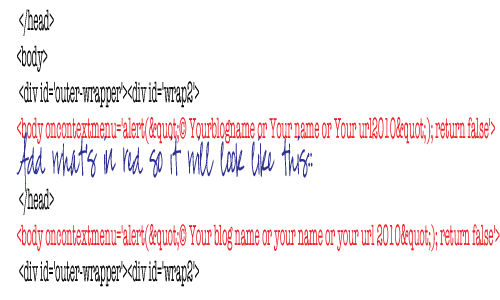
- Now for right click- you can either do what Lisa says and do it for each picture in your post, which still allows people to right click on links on your blog or you can do what I did and add it to your main html code. The down side to this is that for example: If you are on my blog and want to click on a Blogher link in another window or if you clicked on the link for Lisa- you can't right click on it-the warning comes up so you have to double click on it and then click back to get back to my blog. I don't know, that's what I've always done so it doesn't bother me but I guess it can be annoying to some. Again, I just don't want to have to add this code to each picture. I've got two blogs, an etsy shop and sewing to keep up with so I can't be adding all these codes every time I do a post. But that's just me. Here's the code the way it looks in my html: scroll down until you see head followed by body -it's almost all the way at the bottom-

What's in red is how it looks in my code only I have OurUnexpectedJourney-you can just copy the red and add whatever you want after the copyright symbol.
To get the copyright symbol- for MAC it's option and then g. Not sure what it is for PC's but I'm sure you can google it.
So it's up to you, you can add these codes (left and right click) to each picture for every post
or
you can shift pics around, up and down while posting to prevent left click and add the right click to your main html- however, remember that you're preventing people from being able to right click on links (they can still go to the link-they just have to click the back button to get back to your blog)
But when it's all said and done, unfortunately people can still take a screen shot of your pic but if you have a watermark near the main subject this will be harder for them to photoshop or crop it out.
People can also drag your photos onto their desktop but again, with the watermark there, I feel a little bit better. I did my watermark in photoshop.
Hope this helps and is not too confusing. Lisa and Bethany both have great tips and suggestions.

For a PC the copyright symbol is (Ctrl + Alt) + C
ReplyDeleteHold down Ctrl and Alt at the same time and while holding them down type c.
I'm still working on watermarking my photos, I have tried typing the copyright in Word then saving it, but the watermarking option on our Corel Paint Shop Pro won't recognize it so I am stuck. Any pointers anyone?
another way for pc users...
ReplyDeletehold the "ALT" key and type "0169"
the previous mentioned way doesn't work for me in some applications...
why would people want to steal your pictures? shame on them.
ReplyDelete